I have been furiously working on a project that was not in my plans, queue, remote thought, or imaginary nighttime sewing. I was pleasantly surprised to make it through to the Second Round of the PR 2015 Sewing Bee, but the challenge we were given was out of my experience and comfort zone. I quote from the rules:
1 – You must start with an existing piece of fabric. That fabric can be either woven or knit, from stash or new.
2- You must alter or embellish the fabric with a method such as one of the following techniques: stamping, dyeing, free motion embroidery, sashiko, piecing, applique, reverse applique, screen printing, stenciling, painting, embossing, quilting, beading or smocking.
3 – You must use that fabric to create a garment. The garment you create must be a garment wearable by a person, such as a dress, top, trousers, skirt, jacket or jumpsuit. Accessories do not qualify. You may use any pattern you wish (commercial, self-drafted, draped, etc.). Note: you may also reverse the order of rule 2 and 3, modifying the garment after construction, if that works better for your selected technique.
So, what to do? I immediately started to panic, then gave myself a stern talking to and settled down to think what I should do. I wanted to use what materials I had at hand without having to purchase anything, therefore I was left with four options: dyeing, embroidery/beading, smocking or other fabric manipulation, or painting. A couple of fabrics that have been mouldering in my stash popped into mind: a yellow-ish embroidered linen whose colour I had grown to loathe over the years, some golden yellow cotton piqué, or the remnants of peach linen from Vogue 1175. I did dye more than one (for back up purposes, should the first project be an utter fail), but I thought I may as well use the remnant of peach mid-weight linen, since it mattered the least to me.

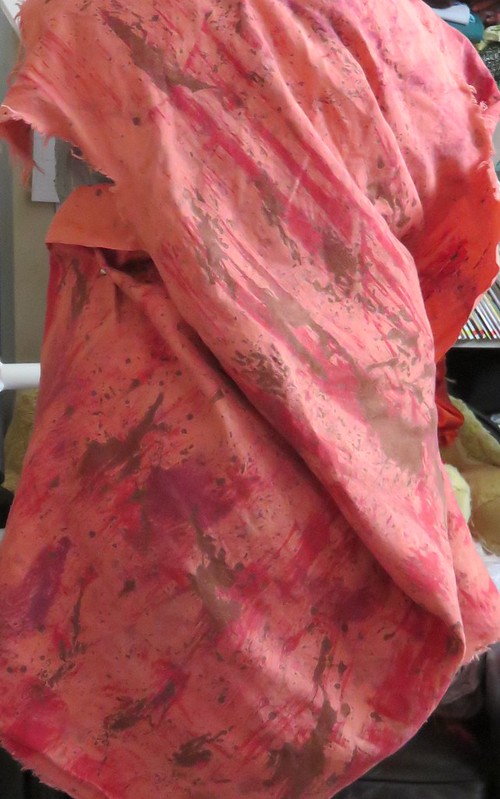
Now, I have no idea what I’m doing with fabric paints or dyes. So I just jumped in. I had brown, red, purple, pink and white/opalescent fabric paints that I chose to use after finding an inspiration fabric.

I had no method and no plan. I just went to work. First I splattered with brown. When I was done, I realized I didn’t have enough brown paint and should have watered it down… a lot. *shrug* Nothing I could do, so I forged ahead with the red. I took care to splatter it differently, but ended up using a scrub brush to give large brush strokes to the fabric. Ghastly, thought I. Let’s see what the purple will do. I mixed some of the pink with the purple to create a lighter shade and dry brushed it in places. The texture of the patio stones (yes, I did this outside) rubbed through the purple… kinda cool. Then I splattered with opalescent/white.
It was the most horribly ugly anything I could have possibly created. Ugh. What to do? Find the empty paint pots, add a lot of water to each, and splatter the fabric with the diluted mixture again. Seemed a bit better…. But I was still horrified at the result.
I let it dry for about 2 hours (not the recommended 24 hours), and rolled it all into a ball and put it into the dryer on high for 40 minutes to set the paint. When I took it out, I hated it. I had a tub of avocade green dye sitting unused after dying the yellow embroidered linen (a much happier result for a different project) earlier that day, so I cut off a piece of the peach linen and stuck it into the dye along with some lightweight RPL that I was planning to make into a cardigan.
In about an hour, I checked the peachy linen and it was still very peach. I was at least hoping for something in the brown range… y’know… pink and green together should make some sort of brownish shade. Not this linen. It was peach, and it was going to die peach.
Not to be beaten, I thought I could try leaving the entire mess in the dye bath overnight. I began to wet the linen, and the paint started to smudge off. Brilliant!! I put it into a hot wash, then the hot dryer again and was much happier with the worn, faded look of the paint.
I was still truly horrified at the result, but my darling eldest daughter and DH insisted it didn’t look as bad as I thought it did, and both declared I should continue with the project. DH also had very specific ideas about the jacket pattern I should choose, but I only had 1.75m to work with. In the end, I chose this lovely little number from Burda 2/2014.

The shaped yokes and sleeve cap pieces would be useful, I thought. So I set to planning and cutting around my red paint splatters and brushstrokes, which seemed rather gory to my mind. I had visions of blood-splattered clothing from a crime scene. Ah well…. at least it would only cost me time. Besides, I was starting to enjoy the challenge of working with what to my mind was an impossible piece of fabric.
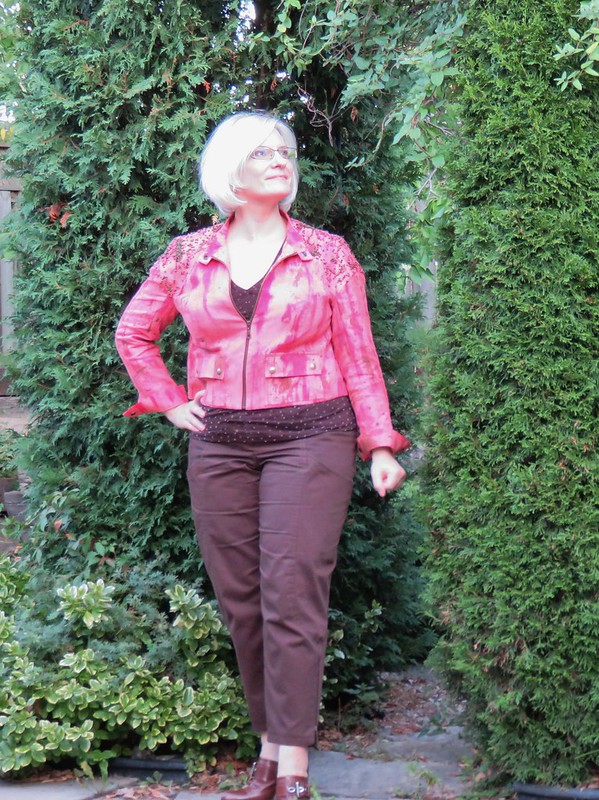
So here’s the finished jacket. About half way through the construction I almost threw it all away, but my DH and DD1 insisted that I should finish it and that it would be much better than I thought it was. I won’t bore you with the construction details, except to say that Burda’s instructions for the reverse corners are atrocious. Vogue would have walked the sewer through the procedure step-by-step and thoroughly. So I went my own way, which I will share in a later post.
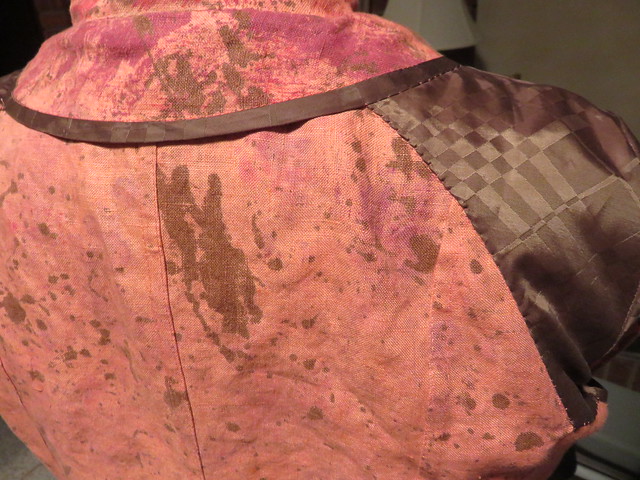
It is unlined, except for the shoulder yokes and sleeve caps, which was fell-stitched into place. I used a hong kong finish on the facings and lower armscyes. All the seams are flat felled for a clean interior.
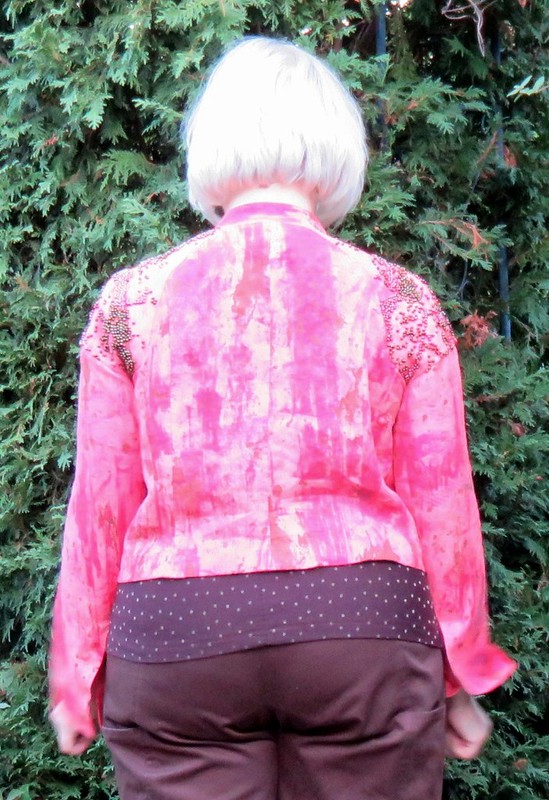
After finishing the construction, the jacket cried out for something other than the paint, so, to emphasize the shoulders, I followed the painted patterns with beads in brown and reds.

And the result? Well, I think this is going to be something that actually gets worn, despite it’s short length. It’s not wonderfully styled in these photos, but I was in a hurry to meet the entrance deadline for the Bee.

If you’d like to see more pictures of this project, please check out my Flickr album.

This was such a good read. I was “with you” in every step. It’s also a great tale for me because I have trouble stepping out of my comfort zone. I would have given up at some intermediate stage (by the way, “it was going to die peach” is so funny!), but the end product is very wearable and original. I am going to learn from this post – thank you.
I love your jacket, the combination of the biker style with the pretty colour and beading detail works beautifully.
This is fabulous! I am thinking of using some sharpies to add some colour to a black and white print and here you are splattering paint with gay abandon. And then beading! Bravo!
That would cost hundreds in a clothing boutique. Wonderful work and the pattern is a keeper for sure.
Your jacket turned out to look wonderful! What an inspiration. Your ordeal taught me that we as sewers need to push through those difficult times. When you can’t see what’s happening while we are creating a garment. Thank goodness that you had your family to encourage you. they dying process was equally encouraging, because I’ve wanted to try something like this for some fabric that I believe needs a little something else. Thanks again.
Oh my goodness! This jacket is even more beautiful than I imagined, good that you refrained from tossing it away. Those shoulders! Love the details in your work, very nice.
It turned out beautiful! So unique!
I think your jacket is wonderful. I really like the beaded trim.
I also think that this came out very nice. I completely understood your trepidation during the process, but your perseverance paid off! Also understand the Burda frustration. I am working on a Burda dress pattern now and have decided to chuck the instructions and do it my way, also thinking “I wish I would have picked a Vogue”…
Very nice. I love the fabric and the beading. I never thought of that!
You are my hero!!!
You should win! I also have imaginary nighttime sewing…..
It’s the best kind of sewing! Always perfect in every way and show-stoppingly gorgeous.
I love the jacket on you. The beading is beautiful. I am following the bee, good luck!
Thank you!
Impressive results and worth all the work. Looks like something that could be found at Olsen. I hope you get lots of wear out of it.
Wow, you’re a trooper! I know if it were me working with a fabric I was not in love with, I would have (for lack of a more ladylike term) shit it together with no though of finishing seams or doing a proper job, but your persistence has certainly paid off, and you even hand-beaded the shoulders – amazing! 🙂
Oh, well…. I thought I may as well do something I was pleased with, even if it never got worn. I became more invested in it once I’d started the beading….
I know what you mean – any kind of hand work makes me feel more in touch with a project 🙂
That actually is a triumph! I was bracing myself for something rather horrible after reading your description of the diying process, but this jacket is great. Luck has it I have Burda 2/14 on top of my “to trace” pile for another project – I might actually give this jacket some serious consideration.
It’s a great jacket pattern. I have every intention of making this up again soon.
Sometimes you just have to keep going. That has become a really nice jacket and I hope you get lots of pleasure wearing it.
Good luck with the Bee.
Thank you. I thought I’d just see it through to the end, and was pleasantly surprised.
It’s really cool looking! And thanks for showing me this pattern. It would be perfect in leather. But too bad the instructions aren’t goid.
The instructions are typical Burda: they assume the reader has an extensive background in construction techniques, and therefore never walk a sewist step-by-step through anything. Even something as simple as understitching, which makes such a tremendous difference to the finished look of a garment, is never mentioned.
I’d call that a save! good luck with the competition, this is a fab jacket!
Save, indeed. 🙂
It’s fabulous! I am so impressed with the beading on the shoulders also. So creative.
Thanks, Rhonda. The beading cost me several tens of hours, but I do find detailed handwork calming.